The Art of Removing Distractions in Product Shots
Table Of Contents
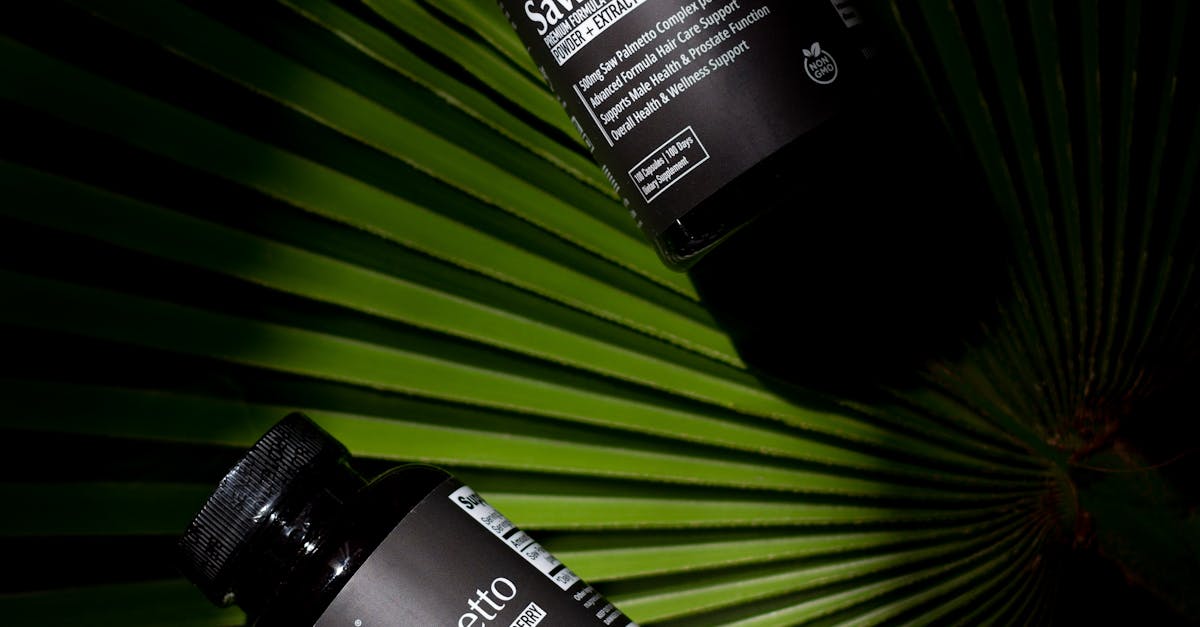
Using Props to Enhance, Not Distract
In the world of product photography, the right props can elevate a shot, adding depth and context. Choosing items that relate closely to the product can create a harmonious composition. For instance, displaying a gourmet coffee maker alongside freshly brewed cups can evoke a sense of luxury and warmth. Selecting props that enhance the story behind the product often leads to better engagement from viewers.
Avoid using props that overshadow or conflict with the main item. Cluttered backgrounds or brightly coloured items can pull attention away from the product itself. Instead, consider simple, neutral-coloured elements that accentuate the product’s features without overwhelming the viewer. The goal is to create a balanced scene where the product remains the focal point while other elements contribute subtlety to the narrative.
Selecting Props That Complement Your Product
Choosing the right props involves understanding the message you want to convey with your product. Each item should serve a purpose, enhancing the overall narrative without overshadowing the main focus. For instance, if you're photographing a gourmet food item, natural elements like wooden boards or fresh herbs can create an appealing context while maintaining the spotlight on the food itself.
A careful selection process also includes considering colour schemes and textures. Props that share a complementary colour palette can harmonise with your product, while contrasting elements can add visual interest. Textures should also play a role; combining smooth items with rougher surfaces can create a dynamic image. Ultimately, the goal is to create synergy between the props and the product, leading to a cohesive and inviting presentation.
Digital Tools for Editing Distractions
In the digital age, a range of software options can assist in removing unwanted elements from product shots. Adobe Photoshop remains a top choice for photographers. Its comprehensive suite of tools allows for precise edits, making it possible to eliminate backgrounds or distortions effectively. The Content-Aware Fill feature simplifies the process by analysing surrounding areas. This enables users to seamlessly patch up blemishes or distractions and maintain the product's integrity.
Alternatives also exist that cater to varying skill levels and budgets. Programs like GIMP offer powerful editing capabilities for free, appealing to those just starting out or seeking cost-effective solutions. Users can access essential features such as clone stamping and layer management, which provide robust support in cleaning up images. Additionally, mobile applications like Snapseed or Lightroom Mobile allow on-the-go editing, ensuring that distractions can be tackled directly from a smartphone when needed.
Best Software for Removing Unwanted Elements
Several software options excel in editing out unwanted elements from product images. Adobe Photoshop remains a top choice due to its comprehensive range of tools, allowing for precise selection and removal of distractions. The Content-Aware Fill feature stands out, enabling users to intelligently fill in backgrounds after an object has been deleted. This capability ensures that the overall integrity of the image is maintained while achieving a clean and professional look.
For those seeking more user-friendly alternatives, applications like Luminar AI and Affinity Photo offer robust editing features with simpler interfaces. Luminar AI’s artificial intelligence tools can automatically detect and remove elements, streamlining the editing process. Meanwhile, Affinity Photo provides a cost-effective solution with a one-time purchase and powerful editing capabilities. Each of these platforms can significantly enhance the quality of product shots by focusing attention on the subject without distractions.
The Role of Angles in Product Representation
The choice of angle can significantly impact how a product is perceived in photographs. Capturing an item from various perspectives allows potential buyers to see its features and functionality in detail. For many products, a straight-on shot can be effective in displaying size and shape. However, experimenting with low or high angles can evoke different emotional responses, drawing attention to unique elements that might otherwise be overlooked.
Utilising dynamic angles can also create a sense of depth and context within the shot. An overhead view may highlight the arrangement of several items, while a close-up can emphasise texture and intricate designs. By thoughtfully selecting these perspectives, photographers can tell a more compelling story, engaging viewers and encouraging them to connect with the product on a personal level. This approach moves beyond mere representation, fostering a deeper appreciation of the item being showcased.
Finding the Best Perspective to Showcase Your Product
Choosing the right angle can significantly influence how a product is perceived. A low angle can create a sense of grandeur, making the item appear more impressive while an eye-level shot establishes a connection with the viewer. Experimenting with various perspectives allows you to highlight the product's best features, drawing attention to what sets it apart from competitors. Each product has its unique character, and the right angle can help convey that charm effectively.
In addition to traditional angles, consider trying unconventional perspectives for a fresh look. Bird's-eye views can provide an interesting outline, while close-ups can reveal intricate details that might not be noticeable from a distance. It's essential to keep in mind the product’s intended use and audience as you explore different angles, ensuring that the chosen perspective aligns with the message you want to convey. This approach not only showcases the product but also deepens the viewer's understanding of its purpose in everyday life.
FAQS
What are some effective props to use in product photography?
Effective props should complement your product without overpowering it. Consider using items that enhance the theme or purpose of your product, such as soft fabrics for clothing or natural elements for food items.
How can I choose props that won't distract from my product?
Select props that are simple and subtle, ensuring they match the colour palette of your product. Neutral colours and minimalistic designs are ideal for keeping the focus on the main item.
What digital tools can I use to remove distractions from my product shots?
Popular digital tools include Adobe Photoshop, Lightroom, and GIMP. These software options offer features that allow you to easily edit out unwanted elements from your images.
What is the best software for beginners to edit product photos?
For beginners, software like Canva and Pixlr can be user-friendly options that provide intuitive interfaces and basic editing tools to help enhance product photos without overwhelming complexity.
How do different camera angles affect the presentation of a product?
Different angles can highlight various features of your product. For instance, a low angle can make an item appear more authoritative, while an overhead shot can provide a comprehensive view. Experimenting with multiple angles can help find the most flattering representation.
Related Links
Tips for Creating Lifestyle Effects in Product Photography EditsUsing High Dynamic Range Imaging for Stunning Product Photos
Techniques for Upscaling Low-Resolution Product Images
Crafting the Perfect Lighting Effects in Post-Processing
Non-destructive Editing: Maintaining Image Quality in Product Photography
Implementing Frequency Separation in Your Editing Workflow